
How to install WSL 2 on Windows 10
Recently Microsoft added a list of new features to the well-received WSL (Windows Subsystem for Linux) named “WSL 2”. This new version of WSL enables features such as increased file IO performance and full system call compatibility and is not enabled by default.
In this guide, we will install, configure WSL2 on our Windows 10 workstation, as well as install a Linux distribution on it.
Prerequisites
To install WSL 2, you must be running Windows 10. The following versions and builds are supported:
- For x64 systems: Version 1903 or higher, with Build 18362 or higher.
- For ARM64 systems: Version 2004 or higher, with Build 19041 or higher.
- Builds lower than 18362 do not support WSL 2. Use the Windows Update Assistant to update your version of Windows.
Step #1 - Enable the “Windows Subsystem for Linux” feature
To install WSL (any version) to Windows 10 we must first enable the “Windows Subsystem for Linux” feature in Windows 10. This can be done in two ways:
using Powershell
To enable the “Windows Subsystem for Linux” open Powershell and type the below command:
dism.exe /online /enable-feature /featurename:Microsoft-Windows-Subsystem-Linux /all /norestartusing GUI
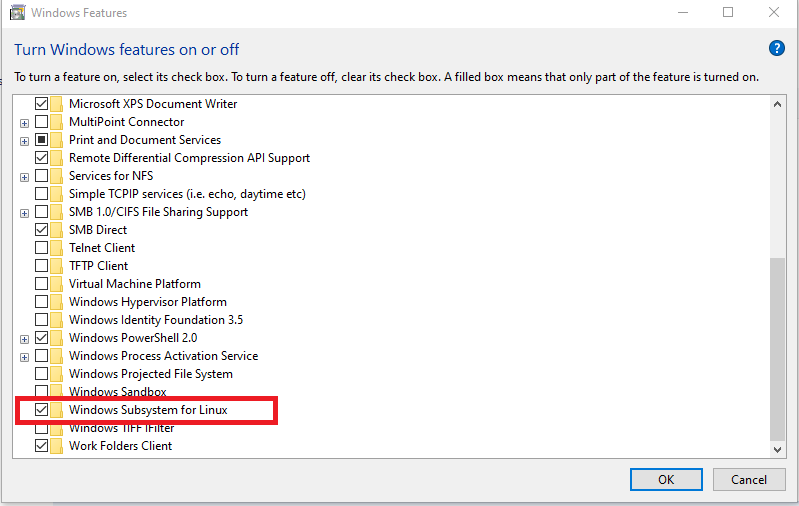
Go to Control Panel -> Programs & Features -> Turn Windows features on or off, then find and enable “Windows Subsystem for Linux” like the below screenshot:
Step #2 - Enable the “Virtual Machine Platform” feature
Next, we need to enable the “Virtual Machine Platform” feature. This can be done in two ways:
Powershell
To enable the “Virtual Machine Platform” open Powershell and type the below command:
dism.exe /online /enable-feature /featurename:VirtualMachinePlatform /all /norestartGUI
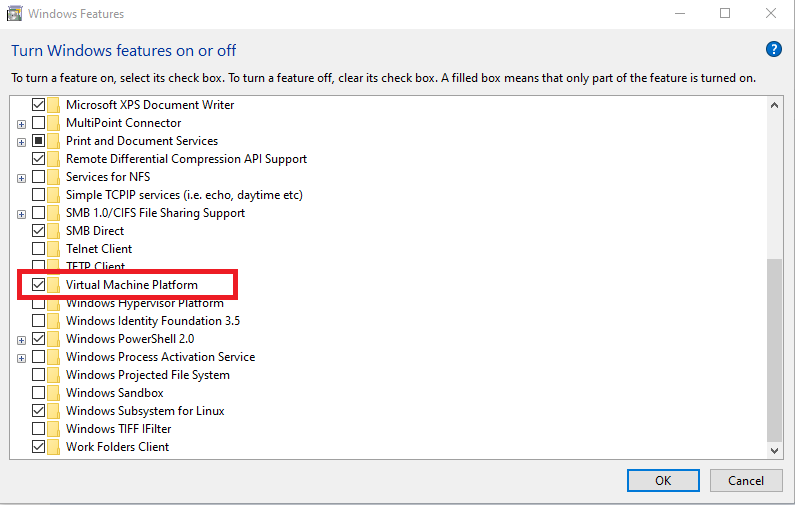
Go to Control Panel -> Programs & Features -> Turn Windows features on or off, then find and enable “Virtual Machine Platform” like the below screenshot:
Step #3 - Download the “Linux kernel update” package
Microsoft provides the Linux kernel update package, which is needed to support the added feature set of WSL 2. You can find the package at the following links:
WSL2 Linux kernel update package for x64 machines
WSL2 Linux kernel update package for Arm64 machines
If you’re not sure what kind of machine you have, open Command Prompt or PowerShell and enter:
systeminfo | find "System Type".After downloading the package for your machine kind, run the update package downloaded in the previous step. (Double-click to run - you will be prompted for elevated permissions, select ‘yes’ to approve this installation.)
Once the installation is complete, restart your machine to complete the WSL install and update to WSL 2.
Step #4 - Set WSL 2 as your default version
As you can have both versions of WSL installed, it is always nice to set the default version of newly installed distributions to WSL2. To do so, open Powershell and type:
wsl --set-default-version 2This will ensure that the extra features are enabled on the Linux distributions you’re going to download and install in the future, but what about the already installed distros?
If you have recently updated WSL to WSL2, chances are your already installed distributions are using WSL 1 features. To check, open a Powershell window and type:
wsl --list --verboseThis will return with a list of installed distributions, along with the Version of WSL enabled on those. To update your installed distributions to the newer feature set, open a Powershell window and type:
wsl --set-version <distribution name> <versionNumber>Step #5 - Install your Linux distribution of choice
Now after we’ve set-up all the needed dependencies for WSL 2 and enabled its feature set by default it is time to download and use your distribution of choice.
The following lists all compatible and available distributions in the Microsoft store at the time of writing:
- Ubuntu 16.04 LTS
- Ubuntu 18.04 LTS
- Ubuntu 20.04 LTS
- openSUSE Leap 15.1
- SUSE Linux Enterprise Server 12 SP5
- SUSE Linux Enterprise Server 15 SP1
- Kali Linux
- Debian GNU/Linux
- Fedora Remix for WSL
- Pengwin
- Pengwin Enterprise
- Alpine WSL
To install any of those, go to the Win10 app store “Microsoft Store” and search for them. After you find your selected distribution, click on “Get” to start the download.
The first time you launch a newly installed Linux distribution, a console window will open and you’ll be asked to wait for a minute or two for files to de-compress and be stored on your PC. All future launches should take less than a second.
You will then need to create a user account and password for your new Linux distribution.
CONGRATULATIONS! You’ve successfully installed and set up a Linux distribution that is completely integrated with your Windows operating system!
Now if you like to test things out and restore the distribution to its original settings, you can uninstall it completely from the Settings -> Apps -> Apps & Features and re-install.
Thank you for reading! Be sure to share this post if you found it helpful and don’t hesitate to chat with me about it!
This post was first published on Stathis’ log book by Stathis Athanasiadis aka StatAth
Comments