
How to install a Windows 11 ISO on unsupported devices
Scenario
There are times, when you need to check Windows 11 on an older unsupported computer, test a VM without adjusting TPM, SecureBoot etc., or do not want to tinker with checksum-correct ISOs on Rufus. Windows 11 has introduced a selection of minimum system requirements that makes it harder for people to install the OS without having the right hardware and settings.
Troubleshooting
When you try to install Windows 11 in the above occasions, you will be greeted with a rather cryptic error message:
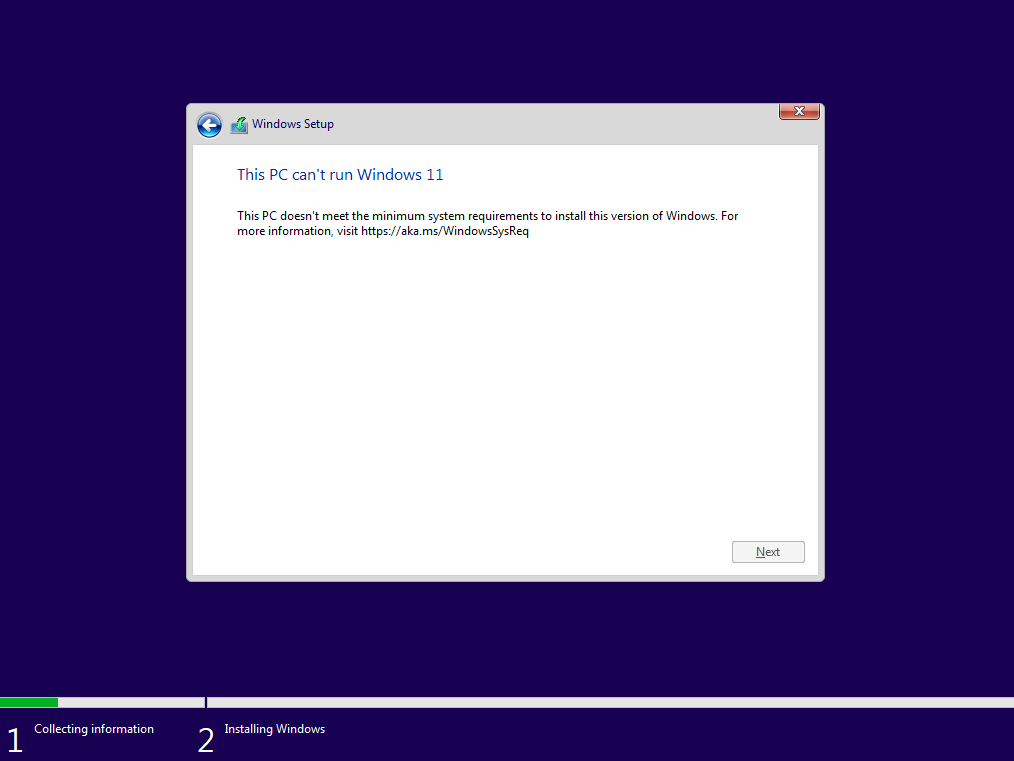
However, there’s some workarounds for the problem and even though it is not recommended, you can get a system installed while not having the necessary requirements: First you need to find what is missing and why Windows 11 is not getting installed, and there’s no better way to do this than checking the logs:
- While you’re on the error message above, click
Back - Press
SHIFT + F10to start aCMDconsole - Type
notepad x:\windows\panther\setuperr.logor typex:\windows\panther\setuperr.log, you can verify that the reason for the failed setup.
For our testing, we have initiated a Hyper-V VM without the necessary number of cores on top of missing TPM and SecureBoot, so our logs included the following error entry:
VerifyProcessorSupported: number of cores INSUFFICIEMT: [1] vs [2][gle=0x0000007a]
(And yes, it had the spelling mistake included too!)
There you might see different error entries explaining the reason why the OS could not be installed, usually complaining about missing TPM or SecureBoot settings.
To fix this, there’s two ways to go about, both including changing registry keys to disable Windows 11 checks of the missing features:
CLI workaround
While you’re still in console, reading about the error log you can type the below to circumvent the checks depending on what you’re missing:
REG ADD HKLM\SYSTEM\Setup\MoSetup /v AllowUpgradesWithUnsupportedTPMOrCPU /t REG_DWORD /d 1REG ADD HKLM\SYSTEM\Setup\LabConfig /v BypassTPMCheck /t REG_DWORD /d 1REG ADD HKLM\SYSTEM\Setup\LabConfig /v BypassSecureBootCheck /t REG_DWORD /d 1REG ADD HKLM\SYSTEM\Setup\LabConfig /v BypassRAMCheck /t REG_DWORD /d 1REG ADD HKLM\SYSTEM\Setup\LabConfig /v BypassCPUCheck /t REG_DWORD /d 1REG ADD HKLM\SYSTEM\Setup\LabConfig /v BypassStorageCheck /t REG_DWORD /d 1
and type “exit” when youve finished.
UI workaround
Instead of doing the above method, you can initiate the registry editor by typing “regedit” while you’re in the console, and add the following keys as per necessary:
- Registry Key:
HKEY_LOCAL_MACHINE\SYSTEM\Setup\MoSetup- Name:
AllowUpgradesWithUnsupportedTPMOrCPU - Type:
REG_DWORD - Value: `1
- Name:
- Registry Key:
HKEY_LOCAL_MACHINE\SYSTEM\Setup\LabConfig- Name:
BypassTPMCheck - Type:
REG_DWORD - Value:
1
- Name:
- Name:
BypassSecureBootCheck- Type:
REG_DWORD - Value:
1
- Type:
- Name:
BypassRAMCheck- Type:
REG_DWORD - Value:
1
- Type:
- Name:
BypassCPUCheck- Type:
REG_DWORD - Value:
1
- Type:
- Name:
BypassStorageCheck- Type:
REG_DWORD - Value:
1
- Type:
Depending on your added keys, you will get to continue the installation as the setup will not check for any missing features, allowing you to install and use Windows 11 on unsupported systems.
So, there you have it, either you prefer to do this by adding keys via CLI or UI (Registry Editor) both solutions should work!
Thank you for reading! Be sure to share this post if you found it helpful and don’t hesitate to chat with me about it!
This post was first published on Stathis’ log book by Stathis Athanasiadis aka StatAth
Comments